Quick overview#
Common usage#
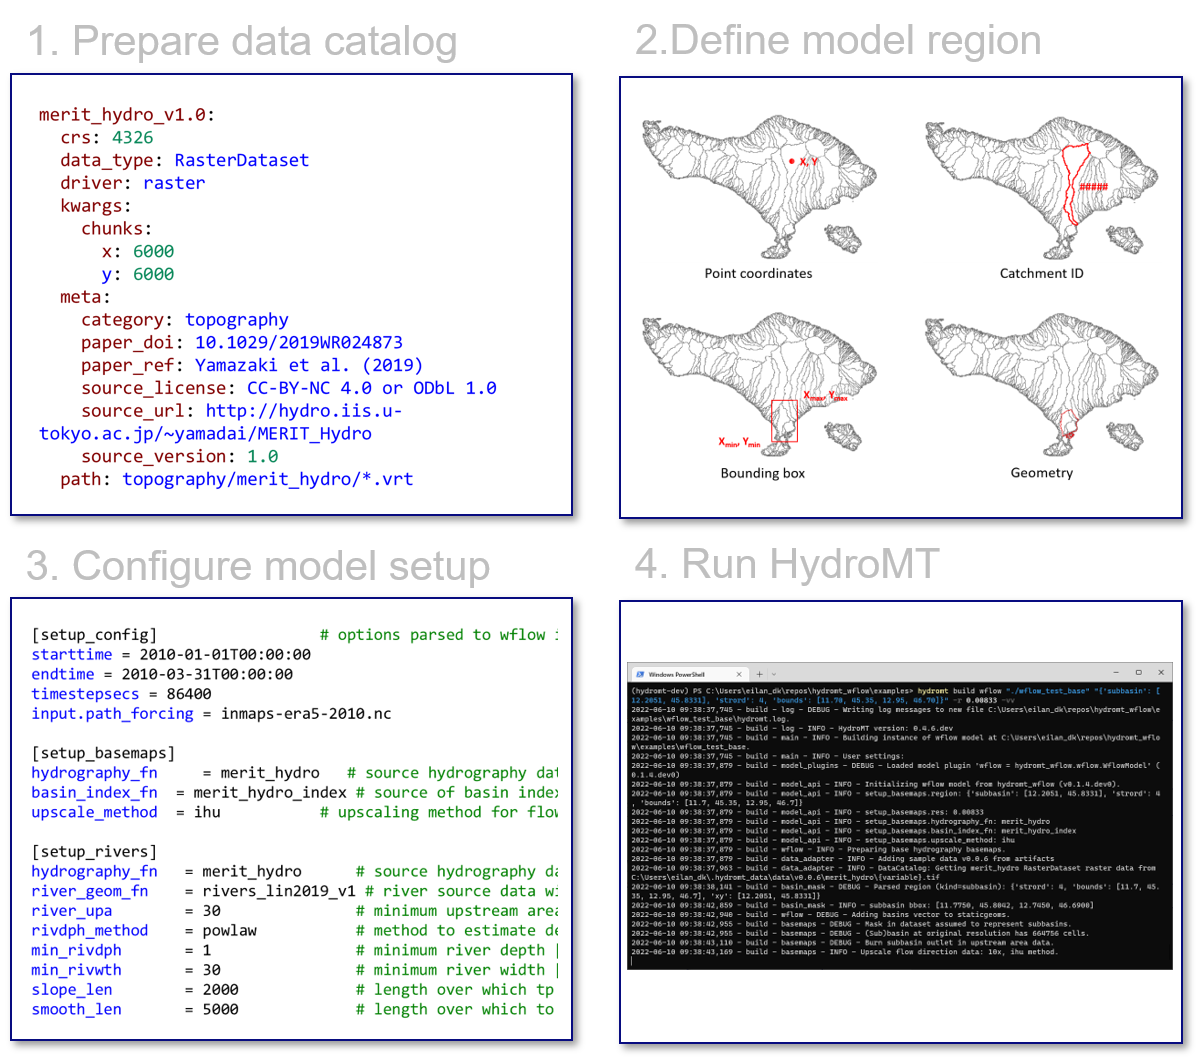
The most common usage of HydroMT is to build a model from scratch and to update and visualize an existing model. Here, a high-level example of how to build a model using HydroMT is provided. Building a model from scratch with HydroMT involves the following generic steps:
Define the input data in a yaml data catalog file or selects available datasets from a pre-defined data catalog.
Define the model region which describes the area of interest. The model region can be based on a simple bounding box or geometry, but also a (sub)(inter)basin that is delineated on-the-fly based on available hydrography data.
Configure the model setup in an yaml configuration file. A HydroMT yaml configuration file represents a reproducible recipe to build a model by listing (in order of execution) the model methods and their arguments. These methods and their arguments are described in the documentation.
Run the HydroMT build method from either command line (as shown in the figure) or Python.
Wflow build example#
Often, we use HydroMT together with a plugin to build a model from scratch. Here, we illustrate this for the Wflow rainfall-runoff model, but the procedure is identical for other models.
Install HydroMT & model plugin#
If you haven’t already done so, first install HydroMT and the HydroMT-Wflow plugin in a new hydromt environment and activate this environment. For more information about the installation, please refer to the installation guide.
$ conda create -n hydromt -c conda-forge hydromt hydromt_wflow
$ conda activate hydromt
Next, check if the installation was successful by running the command below. This returns the available models for HydroMT and should at least contain wflow and wflow_sediment.
$ hydromt --models

>> hydroMT model plugins: wflow (vx.x.x), wflow_sediment (vx.x.x)
Build a model#
Now you can create a model from raw data. To do so, you need to define
the source data: To try out HydroMT, you can make use of the publicly available HydroMT artifacts data catalog which contains data for the Piave basin in Northern Italy and is the default catalog if no other one is specified.
the model region: There are many options to define the region. In this example the model region is defined by the Piave subbasin upstream from an outlet point defined:
"{'subbasin': [12.2051, 45.8331], 'strord': 4}"the model setup configuration: Finally, the model setup needs to be configured. Here, the example configuration from the HydroMT-Wflow repository is used. You can download the configuration file here (right click & save as) and save it in the current directory. For information about specific options, please visit the documentation of the HydroMT plugin of your model of interest.
These steps are combined into the following command which saves all Wflow model files and a hydromt.log file in the wflow_test folder. This Wflow model instance is ready to be run with Wflow.
$ hydromt build wflow ./wflow_test -r "{'subbasin': [12.2051, 45.8331], 'strord': 4}" -i build_wflow.yml -d artifact_data -vv