Network Module#
The network module is a separate module created within RA2CE to help set up a RA2CE model.
It helps to easily, reproducibly and consistently build models from global to local datasets.
The network module’s goal is to create an infrastructure network to be used in further analyses.
There are two possibilities to create a network:
#. downloading a network from OpenStreetMap with RA2CE;
#. creating a network from vector data.
Within the network module, it is additionally possible to determine the network’s exposure to a user-specified hazard using the ‘hazard overlay’ functionality. There are two options to set up a RA2CE model: using scripting and using initialization files (network.ini and analysis.ini). Examples of how to use this module can be found in the Examples and can be tested in the Binder environment.
Data requirements#
The types of possible input file formats to create a network are:
Shapefile of network;
GeoJSON polygon of area of interest for downloading a network from OSM;
OSM PBF file;
Pickle: a python data format, also used to save graphs.
Depending on the required analysis, more data might be needed. Visit the Analysis module page to learn more or explore the Examples in the Binder environment.
Overview of the network creation process#
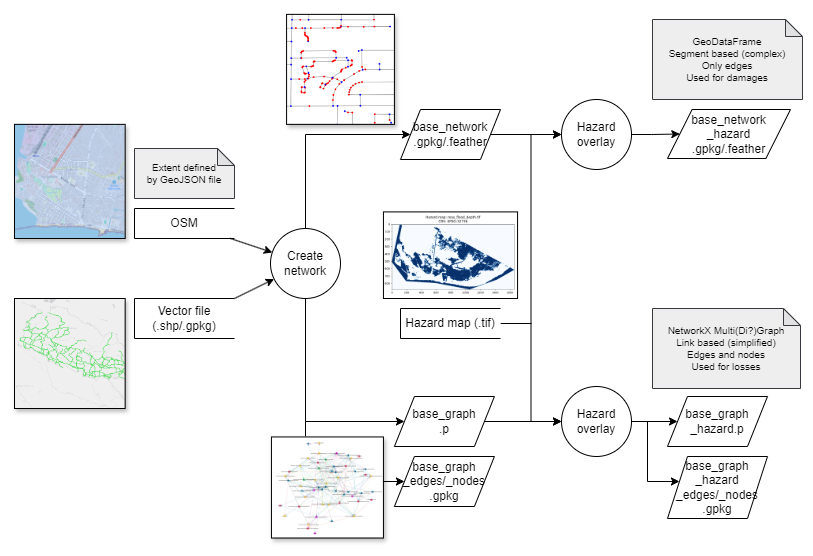
Overview of the files created during the network creation process#
Filename |
Description |
|---|---|
base_network(_hazard).feather/.gpkg |
Complex/segmented Network data (with hazard data) in feather/GeoPackage format |
base_graph(_hazard).p |
Simplified representation of the network (with hazard data) |
base_graph(_hazard)_edges/_nodes.gpkg |
Edges/Nodes of the simplified representation of the network (with hazard data) |
origins_destinations_graph(_hazard).p |
Simplified representation of the origins-destinations (with hazard data) - Only for OD-analyses |
origins_destinations_graph(_hazard)_edges/_nodes.gpkg |
Edges/Nodes of the origin-destination graph (with hazard data) - Only for OD-analyses |
origin_destination_table.feather/.gpkg |
Origin-destination data in feather/GeoPackage format - Only for OD-analyses |
complex_to_simple.json |
Mapping of complex network to simplified network |
simple_to_complex.json |
Mapping of simplified network to complex network |
avg_speed.csv |
Average speed of road segments based on the maximum speed limit data and road type from OSM |
Network from OpenStreetMap using scripting#
The OsmNetworkWrapper
class can download and process OpenStreetMap data for a given region of interest, using the osmnx
package. The region of interest must be specified with a GeoJSON file.
Additional functionalities in the OsmNetworkWrapper
class include:
Filtering the OSM data on (road) type
Assigning the average speed of a road segment based on the maximum speed limit data and road type from OSM
Adding the missing geometries of the edges (road segments) based on the nodes (intersections)
Dropping duplicates in nodes and edges
Snapping nodes to the nearest nodes in the network considering a given threshold
Snapping nodes to the nearest edges in the network considering a given threshold
Adding the missing nodes and edges to the network based on the snapped nodes and edges
Examples of how to use this module can be found in the Examples.
Network from OpenStreetMap using the network.ini initialization file#
The network.ini file contains several parts: 1[project], 2[network], 3[origins_destinations], 4[hazard]. These subsections are used to set the parameters necessary for the creation of different networks. Here, we will focus on the [network] part, as this can be used to create a basic network. To download a network from OpenStreetMap, the user needs to create a geojson of the extent for which they want to create a network. This .geojson polygon should be stored in the static>network folder of the RA2CE project folder. If you are not yet familiar with the folder setup of a RA2CE project, first visit RA2CE.
To create a network from OSM, specify the following parameters in your network.ini file:
network.ini
[project]
name = example_damages

[network]
directed = False
source = OSM download
primary_file = None
diversion_file = None
file_id = id
polygon = my_extent.geojson
network_type = drive #if you want to use the drivable roads
road_types = motorway, motorway_link, trunk, trunk_link #specify road types up to 'residential' and 'unclassified', visit OSM to learn more.
save_gpkg = True

[origins_destinations]
origins = None
destinations = None
origins_names = None
destinations_names = None
id_name_origin_destination = None
origin_count = None

[hazard]
hazard_map = None
hazard_id = None
hazard_crs = None
aggregate_wl = max
Network from vector data using scripting#
There are three ways to create a network from vector data.
The first is to clean the data yourself before using the Network Module and to then use the VectorNetworkWrapper class to read and process the data (e.g., a GeoPackage) to a network.
The second is to use the ShpNetworkWrapper class to read in a shapefile, clean it and process it to a network.
The third one is explained below.
Network from vector data using the network.ini initialization file#
The user can also read in a pre-defined shapefile using the ra2ce_basics_from_gpkg example notebook, where the user can practice with pre-defined data and required folder structure and data format. The user can upload their own shapefile (vector data), store it in the RA2CE static>network folder and specify the name of the file in the network.ini.
file_id and link_type_column (NetworkSection of the NetworkConfigData or in the network section of network.ini) should refer to the id column and road type columns of the shapefile.
network.ini
[project]
name = example_damages

[network]
directed = False
source = shapefile
primary_file = my_shapefile.shp
diversion_file = None
file_id = id #specify the ID column in your vector data
link_type_column = highway
polygon = None
network_type = drive #if you want to use the drivable roads
road_types = motorway, motorway_link, trunk, trunk_link #specify road types up to 'residential' and 'unclassified', visit OSM to learn more.
save_gpkg = True

[origins_destinations]
origins = None
destinations = None
origins_names = None
destinations_names = None
id_name_origin_destination = None
origin_count = None

[hazard]
hazard_map = None
hazard_id = None
hazard_crs = None
aggregate_wl = max
Network overlay with hazard data#
It is possible to perform overlays with hazard data and the network. RA2CE can handle any hazard data in .tif format. It will return information on where the hazard touches the network and give the hazard attribute to the network (e.g. flood depth on a road segment). RA2CE can additionally use this information in analyses (for example to determine the impact of a hazard on the network and on the routes between origins-destinations).
Specify the hazard file name in the network.ini and set some additional parameters. For full explanation, please see the hazard_overlay example.
network.ini
[project]
name = example_damages

[network]
directed = False
source = OSM download
primary_file = None
diversion_file = None
file_id = None
polygon = my_extent.geojson
network_type = drive #if you want to use the drivable roads
road_types = motorway, motorway_link, trunk, trunk_link #specify road types up to 'residential' and 'unclassified', visit OSM to learn more.
save_gpkg = True

[origins_destinations]
origins = None
destinations = None
origins_names = None
destinations_names = None
id_name_origin_destination = None
origin_count = None

[hazard]
hazard_map = my_hazard.tif
hazard_id = None
hazard_crs = EPSG:4326 #choose your CRS and specify the correct code
aggregate_wl = max
Possible parameters network.ini#
Note: the origin-destination parameters are explained in the Analysis module.
[network]
directed = False                            # True / False
source = OSM download                       # OSM PBF / OSM download / shapefile / pickle
primary_file = None                         # <name + file extension or full path of file> to be used for the shapefile option
diversion_file = None                       # <name + file extension or full path of file> can be used to delineate alternative routing options
file_id = None                              # <field name of the ID attribute in the shapefile for network creating with a shapefile>
polygon = map.geojson                       # <name + file extension of the geojson polygon file in the static/network folder> to be used in osm download
network_type = drive                        # drive / walk / bike / drive_service / all
road_types = motorway,motorway_link,trunk,trunk_link,primary, primary_link,secondary,secondary_link,tertiary,tertiary_link #OSM road types to be downloaded
save_gpkg = True                            # True / False

[origins_destinations]
origins = None                              # <file name of the origins file> / None
destinations = None                         # <file name of the destinations file> / None
origins_names = None                        # <origin name that will be saved in the output (e.g. A)> / None
destinations_names = None                   # <destination name that will be saved in the output (e.g. B)> / None
id_name_origin_destination = None           # <column name of origins/destinations data ID> / None
origin_count = None                         # <column name that holds the count in the origin (e.g. population count or freight count)> / None
origin_out_fraction = None                  # fraction of things/people going out of the origin to the destination

[hazard]
hazard_map = None                           # <name(s) of hazard maps in the static/hazard folder> / None
hazard_id = None                            # <field name> / None
hazard_field_name = None                    # <field name> / None
aggregate_wl = max                          # max / min / mean
hazard_crs = None                           # EPSG code / projection that can be read by pyproj / None
overlay_segmented_graph = True              # True / False
Network simplification#
By simplification it is meant to merge links from intersection to intersection.
By default, a simplified graph will be generated and exported. It is possible to exclude links with certain attributes from being merged to other links that have different values for the attributes of interest.
For instance, there might be a case in which we would like to merge links that are not bridges together and merge bridges together. This can be the case for tunnels or any other link type.
To allow such simplification, attributes_to_exclude_in_simplification parameter should be passed (as a list of strings) in the NetworkSection of the NetworkConfigData. Alternatively attributes_to_exclude_in_simplification should be passed (e.g., attributes_to_exclude_in_simplification = bridge, tunnel) in the network.ini file, section network.