Starting your own HydroMT Plugin#
You’ve discovered HydroMT and would like to use it for your own model and wonder how to get started about it? This page gives you some tips and tricks on how to use HydroMT for your own model and start your own plugin. Before reading this, you should already know a little about HydroMT, so please check out at least the User guide and the Overview models section.
Plugin or no plugin ?#
While HydroMT provides several general model classes that can readily be used, it can also be tailored to specific model software through a plugin infrastructure. These plugins have the same interface, but with model-specific file readers, writers and workflows.
Before getting started you should ask yourself these questions:
Does my model have model-specific file formats which are different from the HydroMT defaults?
Does my model require complex data processing workflows that are not covered (and will not be covered) by the generic model classes?
Will there be a lot of users for my model?
And depending on the answers, you can decide to start your own plugin yes or no. Answering yes to any of the previous questions could be a potential reason for starting your own plugin. Below are a couple of advantages and drawbacks of making your own plugin:
Advantages
HydroMT outputs are in the correct file format so my freshly built model is ready to run.
All required input data can be prepared by HydroMT, even using specific or complex processing methods/workflows.
Templates and easy to use/understand functions are more easily available.
Maintained and central place for model specific functions/workflows (eg reading/writing in correct format etc.)
Drawbacks
Need to create and develop a plugin repository.
Need to support and maintain the plugin repository (if open-source, which we encourage).
To help you decide some more in-depth explanation is also provided below.
As mentioned user guide, HydroMT interacts with models using the Model API class and also provides several sub-model classes:
GridModel, MeshModel, VectorModel, NetworkModel which will be described in more detail below. Using
these sub-model classes, you might be able to already prepare most and if not all of
the data you need to build your own model. Do note however that these generic classes can only write model data in netcdf,
geojson (or other formats supported by geopandas), and configurations in either yaml, toml or ini file format. So
in case your model needs different file formats, you will need to convert or write the output files in different formats.
Another advantage of writing your own plugin is that other users from the same model can easily build instances of that model re-using the plugin. So for example, converting from netcdf to model specific file format, using pre-defined HydroMT building configuration templates or parameter default values. It might also be more instinctive and guided for your model building methods.
For example, let’s say that your model is a GridModel for which you need to prepare a landuse
classification map. The resampling for this map should be done using mode to avoid creating new imaginary land use classes.
This could happen for example if you would use e.g., average.
In addition to the classification map you also need two landuse parameters roughness N and infiltration inf.
Using HydroMT generic methods, for your user, the build configuration file would look like this:
setup_grid_from_rasterdataset:
  raster_fn: vito
  fill_method: nearest
  reproject_method: mode
  rename:
    vito: landuse

setup_grid_from_raster_reclass:
  raster_fn: vito
  reclass_table_fn: vito_reclass
  reclass_variables:
    - manning
    - infiltration
  reproject_method:
    - average
    - average
  rename:
    manning: N
    infiltration: inf
While in your plugin, you could make it easier for your user by creating simplified function(s) re-using or wrapping the core methods. There is an example in the setup methods section on how the python code of the function would look like, but for the user, the same step could then look like:
setup_landuse:
  landuse_fn: vito
  reclass_table_fn: vito_reclass
Finally, with the generic methods and sub-model classes of HydroMT, we try to support a certain range of data processing methods. If you find that there is no method available for your case, you can always open a feature request issue and if we think your proposed method can be re-used by others, it could be added to the core. However, for some data processing workloads, this will not be the case. This could be a very strong reason for you to write your own plugin.
Create your own plugin repository#
HydroMT makes it pretty easy to create your own plugin. We are quite flexible on how you would like to organise and maintain your plugin. Below you can find the minimum requirements to register your own new model plugin for HydroMT.
In case, you want to start creating your own package, we have also prepared a cookiecutter template to help you set up a project for your plugin including minimal testing and documentation by just filling out a couple of questions :) . This template along with instructions are available at: hydromt-plugin-template.
Requirements#
All you really need to do to make a new HydroMT plugin is to
create a new HydroMT Model class (e.g. WflowModel) in a python package and register it properly. Currently HydroMT uses the
entrypoints package to advertise its, well, entrypoints. Entrypoints are how you can tell HydroMT core about your plugin. They
can be defined within your package setup definition file (typically your pyproject.toml for pypi packages). As an example we can look
at the current hydromt_wflow model. Specifically it’s this line in the pyproject.toml:
[project.entry-points."hydromt.models"]
wflow = "hydromt_wflow.wflow:WflowModel"
This snippet will tell HydroMT core three things:
the class
WflowModeldefines a HydroMTModelcompatible class.it is located in the file hydromt_wflow//wflow.py
it implements the new plugin class
WflowModel, with can be accessed from the HydroMT CLI with short name wflow
Now, how do you define the new plugin Model class? To make sure that your model is compatible with HydroMT core,
you can use one of the following classes as a base for your model:
* Model is the most generic class of HydroMT core which is used as a base for all other model classed.
* GridModel for regular gridded or distributed models,
* MeshModel for unstructured grid(s) models,
* VectorModel for lumped or semi-distributed (vector) models
* NetworkModel for network models.
This allows you to use the HydroMT model class methods as well as create any functionality on top of that. To define your new model class, e.g. WflowModel, you should make sure that in the python script that is referenced by the entry-point. And that’s it! If everything has gone well, you should be able to access your code through HydroMT now!
Typical HydroMT repository structure#
With HydroMT and some of its plugins, we usually use a classic folder structure and file organisation. It not mandatory to follow this structure But if you choose to, a classic folder structure and files for a HydroMT plugin (eg mymodel) looks like this:
docs: folder containing your documentation pages.
examples: folder containing example models, templates for building/updating models, jupyter notebooks.
tests: folder containing your test scripts.
pyproject.toml: your build-system requirements for your python package (used by pypi and conda).
README.md: your landing documentation page for your repository.
LICENSE: license file for your repository.
hydromt_mymodel: folder containing the functions for your plugin.
__init__.py: init python script used when importing the hydromt_mymodel package in a python script.
mymodel.py: your main script where you will your plugin Model class (MyModelModel) and main functions (read/write/setup).
workflows: folder containing python scripts for data processing functions.
data: folder containing model building templates and default values or data for your plugin. For example, it is usually easier to update an existing template configuration file of your model rather than building it from scratch. You can store such a template in that folder. If your model has default values for some parameters, you can also store them here, ideally with a model data catalog to read the corresponding files.
Model class and components#
The main goal of your plugin is to be able to build and update model instances for your own software. As a reminder, the figure below illustrates the process of model building in HydroMT:
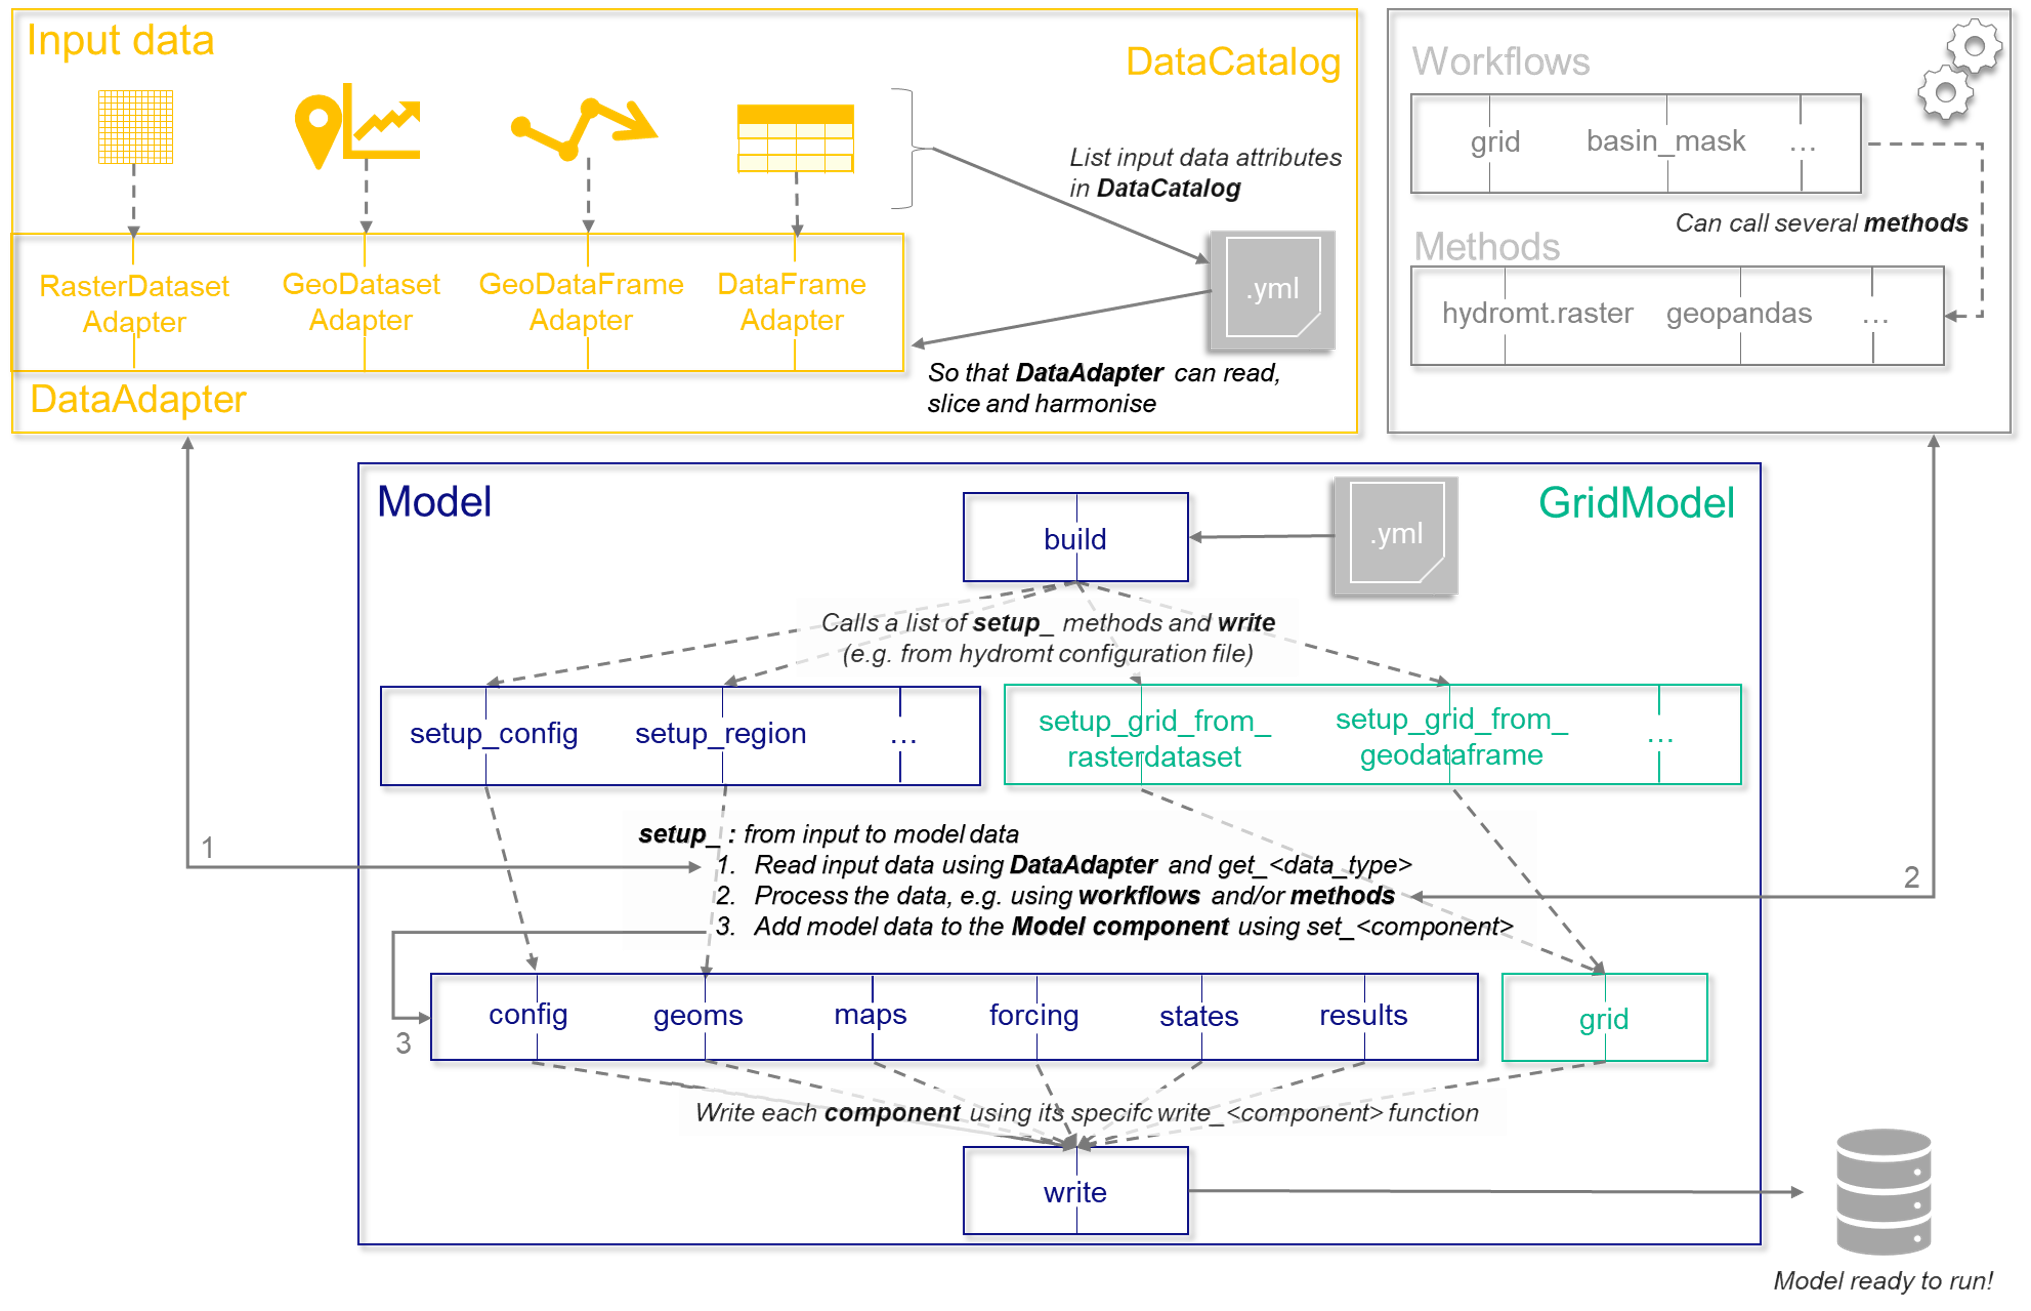
Model building process in HydroMT.#
In this section, we will detail the bottom part of the schematic above ie how to initialise your HydroMT Model class for your plugin, the main properties and setup methods and how to work with its model components. The top part of the schematic (data preparation) is taken care of by the core of HydroMT.
Initialisation#
In the create plugin section, we already saw which HydroMT Model class to choose for your plugin. Here we will focus on additional
properties and the initialisation of your new Model subclass.
To fully initialise your new subclass (eg MyModelModel), you need to initialise a couple of high level properties and in some cases, you may wish to modify
the default initialisation function of you parent class (the HydroMT core class you choose, Model or GridModel etc.).
Tip
In python, a child class (eg MyModelModel(Model)), inherits all methods and properties of the parent class (Model). If you wish to completely overwrite one
of the parent methods (eg setup_region), you can just redefine the function in the child class using the name (setup_region). You can also decide to
re-use the parent function and for example add some extra steps, change the default values or the docstring of the function. For this, you can redefine the
function in the child class, and within the redefined function, call the parent one use super() python class attribute (super().setup_region). You will see
an example below for the initialisation function __init__ .
Model components#
A reminder from the Model guide:
HydroMT defines any model through the model-agnostic Model API based on several general components and computational unit components. Each component represents a specific model data type and is parsed to a specific Python data object. The general components are maps (raster data), geoms (vector data), forcing, results, states, and config (the model simulation configuration). These are available to all model classes and plugins. The computational components are different for different types of models: i.e. grid for distributed or grid models, vector for lumped or semi-distributed models, mesh for mesh or unstructured grid models, and network for network models (to be developed).
So typically, when you want to add data to your model (DEM, precipitation, parameters etc.), you add data to one of the
specific Model components. To add data to a component, the set_<component> methods should be used and each of the components can be
read and written using the specific read_<component> and write_<component> methods.
A table that lists the base model components common to all model classes can be found at The Model Overview Page All base model attributes and methods can be found in the API reference
Reading & Writing model components#
Because the way that models consume data is often model software specific, the main part of writing a plugin is writing the
Input/Output (IO) methods to prepare data exactly as your model expects them, in the correct format. To do this you’ll
be overwriting most read_<component> or write_<component> methods in your model class. That will ensure that the
data comes in and goes out exactly as you want.
In the default HydroMT CORE read and write methods, xarray objects are written as netcdf files, geoms as GeoJSON files by
default but any geopandas driver is allowed. config can be either a TOML or YAML file. So again, you could decide to
completely overwrite the parent read and write methods or change the defaults.
Eg if your geoms should be written in GeoPackage format rather than GeoJSON and in a geometry folder in your model:
def write_geoms(self):
  """ Write model geometries to a GeoPackage file at <root>/geometry/<name>.gpkg """

  super().write_geoms(
    fn = "geometry/{name}.gpkg",
    driver = 'GPKG'
  )
If you are writing your own read/write functions, some good practice steps of the function:
For writing, check first if the object you are writing is not empty, if so, you can simply skip the rest. Example:
if len(self.geoms) == 0:
  self.logger.debug("No geoms data found, skip writing.")
  return
2. For reading or writing, check that you have the right permission. For example, in build mode (‘w’ or ‘w+’), the model should be empty, so you should not be able to read existing model files. In some cases, python users may only want to read a model using HydroMT to visualise or plot data. As a protection, the model can then be opened in read only mode (‘r’) and HydroMT should not be able to overwrite any data. HydroMT Model class has two properties you can use to check for this:
self._assert_read_mode() if a model can be read
self._assert_write_mode() if a model can be written
For reading, initialise the model component with, e.g. for geoms self._initialize_geom(skip_read=True). This will initialise the component with an empty object, but ensure that the component is not read twice.
If needed, transform and write the component to the right format and file(s).
Don’t hesitate to put some logger information for your user.
Set model components#
As mentioned previously, to add data to one of the model component (e.g. a DEM raster data to maps), the set_<component>
methods should be used. In the background, some checks are performed to make sure that the data is in the right format
and, if in appending mode, existing layers of the model component are read first. You should not have to change the
set_<component> methods.
Note
In the background, the actual data is stored not directly in the <component> attribute itself but in a private
attribute (eg _maps for maps). The public component, (eg maps), actually just fetched the data
from the private attribute _maps, but makes sure that in read mode it reads existing layers of the component first.
It is highly recommended, in your plugin to always use the public model component (eg maps).
Additional Model properties#
You can have a look at the Model API documentation to find out all other properties of the Model class and
the other subclasses. Apart from the components here are a couple of useful properties to use when developing your plugin:
root: path to the root folder of the model instance you are working with.crs: the reference coordinate system (pyproj.CRS) of the model.region: the region (GeoDataFrame) of your model, stored ingeoms.data_catalog: the current data catalog you can use to add data to your model.logger: the HydroMT logger object for your model instance._read: flag if the model is in read mode (‘r’ or ‘r+’ when initialising)._write: flag if the model is in write mode (‘w’ or ‘w+’ when initialising).
Some submodel classes can have additional attributes based on their additional components, so check out the API reference.
Setup basic model objects#
When building a model from scratch, the first thing you should do is take inventory of what your setup_* functions
(e.g. setup_grid, setup_mesh, etc.) need. They typically (though not always) take the region of interest as an
argument so that is usually a good place to start. This consists of the region in the world your model is located in,
if needed its CRS and its computational unit (grid, mesh, response_unit etc.). This is usually typically set by a first
base or region setup method which typically parses the region argument of the HydroMT CLI. The idea is that after this
function has been called, the user should already be able to have the minimum model properties or files in order to
be able to call HydroMT to update the model to add additional data (build is not required anymore).
For example, this is what the setup_region from Model does by adding region to geoms, or setup_grid
from GridModel which generates a regular grid based on the region argument, a CRS and a resolution.
You can re-use the core methods or decide to define your own.
Note
Order of the setup methods: Typically, building a model starts with defining the computational units (grid, mesh, vector etc.). Afterwards data layers are added to model components and there might be dependencies between the different layers. For example, a method to define river dimensions should probably be called after a method which defines the river cells on the grid or mesh itself. However, there is no real check on the order in which setup methods are called apart from checks that you can build-in that certain layers are already present with clear error messages. Clear documentation will help your user too. For Command Line Interface users, the functions in the hydromt configuration yaml file will be executed in the order they appear in the file. Python Interface users can call the setup functions in any order they want from a script.
Setup methods#
In general, a HydroMT setup_<> method does 4 things:
1. read and parse the data using the
DataCatalogand correspondingDataAdapter.get_datamethod (get_rasterdatasetfor RasterDataset,get_GeoDatasetfor GeoDataset,get_geodataframefor GeoDataFrame andget_dataframefor DataFrame).
process that data in some way, optionally by calling an external workflow function.
Optionally, rename or update attributes from HydroMT variable conventions (name, unit) to the specific model conventions.
add the data to the corresponding HydroMT model components.
Below is a simplified example of what a setup function would look like for a hypothetical landuse grid from a raster input data using an external workflow from hydromt core is:
def setup_landuse(
      self,
      landuse: Union[str, Path, xr.DataArray],
  ):
      """Add landuse data variable to grid.

      Adds model layers:

      * **landuse_class** grid: data from landuse

      Parameters
      ----------
      landuse: str, Path, xr.DataArray
          Data catalog key, path to raster file or raster xarray data object.
          If a path to a raster file is provided it will be added
          to the data_catalog with its name based on the file basename without
          extension.
      """
      self.logger.info(f"Preparing landuse data from raster source {landuse}")
      # 1. Read landuse raster data
      da_landuse = self.data_catalog.get_rasterdataset(
          landuse,
          geom=self.region,
          buffer=2,
          variables=["landuse"],
      )
      # 2. Do some transformation or processing
      ds_out = hydromt.workflows.grid.grid_from_rasterdataset(
          grid_like=self.grid,
          ds=da_landuse,
          fill_method="nearest",
          reproject_method="mode",
      )
      # 3. Rename or transform from HydroMT to model conventions
      rmdict = {"landuse": "landuse_class"}
      # Or using a properly initialised _GRIDS
      # rmdict = {k: v for k, v in self._GRIDS.items() if k in ds_out.data_vars}
      ds_out = ds_out.rename(rmdict)
      # 4. Add to grid
      self.set_grid(ds_out)
Note
Input data type of the setup method: Typically a setup function tries to go from one type of dataset
(landuse raster) to a HydroMT model component (landuse map in maps). So it’s good to make clear for your user in
the setup function docstrings which type of input data this function can work with. You could decide to support
several data types in one setup function but be aware that the GIS processing functions like resampling, reprojection can
be quite different for a raster or a vector for example. So you could decide to create two setup functions that
prepare the same data but from different type of input data (eg setup_landuse_from_raster and setup_landuse_from_vector).
Workflows#
Because the python script defining your plugin Model class can get quite long and it makes unit testing easier, we encourage you to use or define external data processing functions. In HydroMT these are usually called workflows. These workflows are usually stored in separate python scripts that you can decide to store in a workflow subfolder.
A couple of tips if you want to define workflows:
check out the workflows available in HydroMT core
avoid passing the HydroMT model class to your workflow function, but pass the required arguments directly (eg crs = self.crs, data = self.grid). Ideally the workflows work from common python objects like xarray or geopandas rather than with the
Modelclass.if you want to do some GIS processing on
RasterDatasetorGeoDataset, HydroMT defines a lot of useful methods. Check out the Raster methods API doc for RasterDataset and GeoDataset methods API doc. ForGeoDataFrame, the geopandas library should have most of what you need (and forUgridDatasetor mesh, the xugrid library). For computing or deriving other variables from an input dataset, HydroMT contains also a couple of useful workflows for exampleflwdirfor flow direction methods,basin_maskto derive basin shape, orstatsto derive general, efficiency or extreme value statistics from data.
Good practices#
On top of code development for your plugin, you can also find some good practices for your plugin repository in the Developer guide. Here are some last tips:
Documentation: for other people to use or contribute to your plugin, good documentation is really key. We really encourage you to write docstrings for your function (HydroMT uses the NumPy style) as they can directly serve and be imported in your online documentation. So no need for duplicates. Type hints are also encouraged to know what type of arguments each function is expecting. Finally, for the
setup_<>function, it is good to mention if your input data should have required or optional variables (including names and units) to help out your user.Examples: if you can, it is nice to include some example models or build configuration template files with your repository. Jupyter Notebook can also easily be included in GitHub documentation.
Testing: you should also test the functions you develop for your plugin. We use pytest in HydroMT for this. You can test by developing unit test for your functions, or build a model and compare to a previously built one (eg in the examples folder). The
ModelAPI includes a couple of functions that can help you with testing so you can check them out:_test_model_api(),_test_equal()
Advanced Topics#
Mixing model sub-classes#
If you want to mix functionalities from different sub-model classes, e.g. your model contains both regular grids and semi-distributed units, most model classes also
provide Mixin variants that you can use to mix and match a bit more modularly. This is actually how the generic sub-classes are defined,
as a mix of the main HydroMT Model class and the Mixin of the additional new component defining then:
class GridModel(Model, GridMixin):
Tip
Choosing the right HydroMT Model or submodel class for your plugin depends on your main model characteristics. Each sub-model class implements
a new HydroMT Model component, grid for GridModel or mesh for MeshModel and adds the accompanying setup, read and write methods.
So choosing the one or the other, or adding a Mixin depends on what type of model or input data structure you need to prepare. Note that if your
Model class is defined as (1) PluginModel(GridModel) or (2) PluginModel(Model, GridMixin), in both cases the grid object and relative methods
are available. The main difference is the dominant object for your model in case of (2) will be grid and in case of (1) the region,
i.e. when looking for example for the model CRS property, in case of (1) the crs will be grid.crs and in case of (2) region.crs. Also, in
update mode, in case of (2), no additional data can be added to your model if the grid object is not yet defined (ie your model grid extent and
resolution does not yet exist).
Adding a new property or component#
If you wish to add additional properties or attributes to your plugin Model subclass, you can either decide to add simple
attributes directly in the initialisation function __init__ or define specific properties. Example for a shortcut to the basin
vector in the geoms object:
@property
def basins(self) -> gpd.GeoDataFrame:
  """Returns a basin(s) geometry as a geopandas.GeoDataFrame."""
  # Check in geoms
  if "basins" in self.geoms:
    gdf = self.geoms["basins"]
  else:
      self.logger.warning(
          f"Basin map {self._MAPS['basins']} not found in maps or geoms."
      )
      gdf = gpd.GeoDataFrame()
  return gdf
In most cases, we hope that the components defined in HydroMT Model classes (config, geoms, maps, forcing, states,
results) and its generic subclasses (grid, mesh, vector) should allow you to store any data required by your
model in a proper way. If it is not the case, you can always define your own new model components by respecting the following steps
(example if your model has a lot of 2D non-geospatial tabular data that could nicely be stored as pandas.DataFrame objects, tables):
Initialise your new component placeholder in the
__init__function, if possible with None.
self._tables = None
Define the component itself as a new property, that looks for the placeholder and tries reading if empty in read mode.
@property
def tables(self) -> Dict[str, pd.DataFrame]:
    """Returns a dictionary of pandas.DataFrame tabular files."""
    if self._tables is None:
      self._tables = dict()
      if self._read:
        self.read_tables()
    return self._tables
Define a reading and a writing method for your new component.
def read_tables(self, **kwargs):
  """Read table files at <root> and parse to dict of dataframes"""
  if not self._write:
    self._tables = dict()  # start fresh in read-only mode

  self.logger.info("Reading model table files.")
  fns = glob.glob(join(self.root, f"*.csv"))
  if len(fns) > 0:
    for fn in fns:
      name = basename(fn).split(".")[0]
      tbl = pd.read_csv(fn)
      self.set_tables(tbl, name=name)

def write_tables(self):
  """Write tables at <root>."""
  self._assert_write_mode
  if len(self.tables) > 0:
    self.logger.info("Writing table files.")
    for name in self.tables:
      fn_out = join(self.root, f"{name}.csv")
      self.tables[name].to_csv(fn_out, sep=",", index=False, header=True)
Define a set function in order to add or update data in your component.
def set_tables(self, df: pd.DataFrame, name:str):
  """Add table <pandas.DataFrame> to model."""
  if not (isinstance(df, pd.DataFrame) or isinstance(df, pd.Series)):
    raise ValueError("df type not recognized, should be pandas.DataFrame or pandas.Series.")
  if name in self._tables:
    if not self._write:
      raise IOError(f"Cannot overwrite table {name} in read-only mode")
    elif self._read:
      self.logger.warning(f"Overwriting table: {name}")
  self._tables[name] = df